Search This Blog

Saturday, 29 June 2013

*New* Barry M Gelly Nail Polish in Greenberry Swatch

Hey guys today I went into Superdrug and couldn't resist this colour! It is so beautiful and bright, perfect for summer!
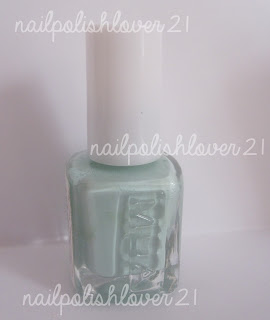
This is the nail polish. As you can see it is a turquoise green sort of colour. It is a bit more green in real life than in this picture though. I used Essie Protein Base Coat and then for a top coat I used Seche Vite which made it so shiny and smooth.

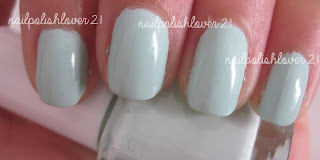
This is one of my nails up close, sorry for the awful cuticles and blurry picture, it was a bit rushed :(. I used 2 coats of Greenberry, but only 1 coat was necessary. It is called a 'Hi Shine' nail polish and it is quite shiny but I find it needs a top coat to even out the coats. 

I bought it from Superdrug for £3.99 I believe. 


Tuesday, 25 June 2013

New MUA Nail Polish Swatches!

Hey guys so my last MUA polish post is quite popular so I decided to do another one as they released new polishes recently.
To see a more in depth review scroll down <3

This is Pistachio Ice Cream. I have a separate review of it here. I used 2 coats, and you can purchase it here. 

This is Lush Lilac. It is a baby pink colour that has a sort of lilac tint, it is such a pretty pastel colour. I used two coats. You can purchase it here.

This is Bold Blue. It is a very bright blue. It reminds me of a sunny day :) aha. You can purchase it here for £1. (Not being sponsored by MUA lol). I used 3 coats, it is not as pigmented as the other two.

The consistency of these are really nice, except the bold blue is more watery. Overall these are definitely worth the money - its only a pound and there are some other great colours I want to purchase.

Business email: nailpolishlover21@outlook.com


Friday, 21 June 2013

MUA Pistachio Ice Cream Nail Polish Review

Hey guys so I saw everyone raving about the new MUA nail polishes, and about how they are so pigmented and amazing so obviously I had to go and buy some. I got 3 but I'll only be reviewing this one today, if you want to see the other ones then comment below and let me know!

 This is the colour (Pistachio Ice Cream), as you can see it is a very pale mint green colour. I used a base coat and then 2 coats of this MUA polish. I didn't use a topcoat, with 2 coats it is quite shiny so I don't think a top coat is necessary. 
This is the bottle. Its so cute! A much better design than the old MUA polish bottles. It does look identical to the Essie bottles but who really cares? Not me! I think it is a 6ml bottle. The price is the best thing about this nail polish, it is only £1!!!! Every time I have spare change I'm going to buy an MUA nail polish now :)

I have swatches of old MUA polishes here

Business email: nailpolishlover21@outlook.com

Wednesday, 12 June 2013

Pink and Gold | NOTD

Hey guys so I thought this nail combination was so cute so I had to blog about it!

This is the nail combo. I chose a bright hot pink colour for the nails with a gold colour on the ring finger.
This is Sally Hansen Complete Salon Manciure in Shrimply Divine
This is Models Own nail polish from a nail art set. 

Business email: nailpolishlover21@outlook.com

Saturday, 8 June 2013

Essie Protein Base Coat Review

Hey guys so recently I have been looking for the perfect base coat that does its job and a not too fancy and I found the perfect one.

The base coat has a thin consistency and makes your nails have a slight white tint that is a bit noticeable, but I still wear it by itself sometimes and it looks fine. It prevents staining but with some nail polishes I still find that they stain. It has improved the condition of my nails, they are definitely stronger now that I've started using it regularly. 

It is £9.75 which is pretty pricey compared to most drugstore nail products but it is 15ml so it will last ages. It is worth it because a drugstore base coat will be around £4 for 8ml so you might as well pay a little bit more for double the product. :) ok bye 

Thursday, 6 June 2013

Pink and White Polka Dot Nails | Tutorial

Hey guys so I know its been way too long but I decided I'm going to start back up with my youtube and blog. So I decided to kick start it with a nail tutorial! And I filmed a tutorial for this nail look but the file got corrupted after I spent about 2 hours editing it *sigh*. So its a picture tutorial for today. Scroll down to the bottom of the post for products used :)

This is the nail look its a simple design that is so quick and easy, you only need a few polishes and tools!
First apply 2 coats of white nail polish, or until its opaque. And don't worry if its messy
I applied pink dots with a dotting tool in a curve towards the tip of the nail, on all the nails except the ring finger. Then make a heart shape with the dots and fill it in. If you don't have a dotting tool you can use a toothpick. 
Now clean up and you're finished!

Products Used:
Sally Hansen Complete Salon Manicure in Shrimply Divine -Bought mine at Boots, cant find a link but for the US: http://www.amazon.com/Sally-Hansen-Complete-Manicure-Shrimply/dp/B003VDGGF6


Related Posts Plugin for WordPress, Blogger...